Tutorials > Tutorial n°1: Tutoworld
In this first tutorial, we're going to learn to make a simple but well-featured Cubzh solo-game: "Tutoworld"! We'll see the basics of coding a game in Cubzh, and we'll explore quite a few important concepts for using the engine like a pro. Here's a little mouth-wathering demo of the finished thing:
As you'll see very soon, this is actually quite straight-forward to do thanks to the various built-ins in Cubzh's API!
So, ready to get started? Let's dive in and create our new world :)
Creating a new world
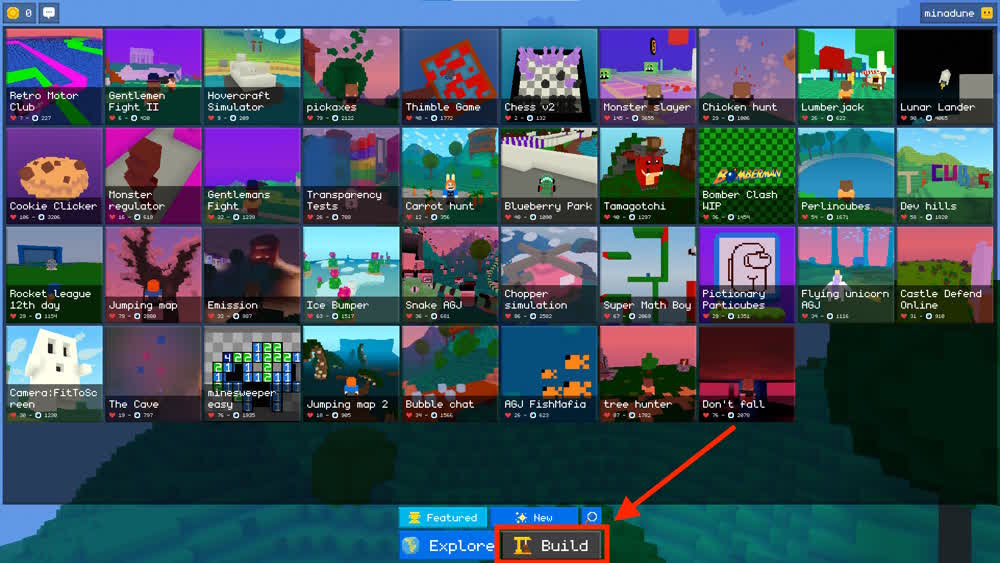
To create a new world of your own, open the Cubzh app and, in the main screen, click on the 🏗 Build button at the bottom of the screen:
This brings up the list of worlds you already created, and you can easily switch to your list of items with the top row of buttons:
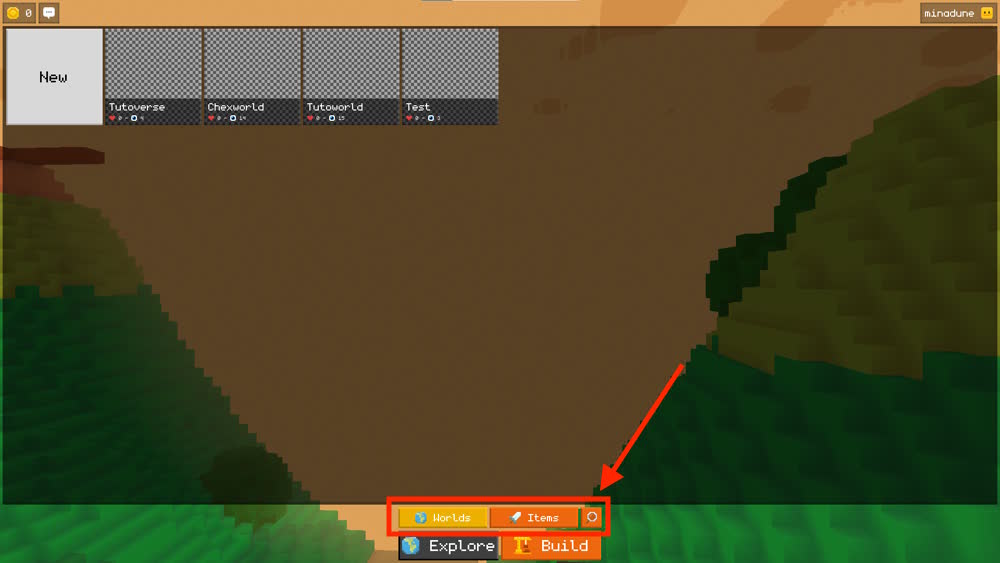
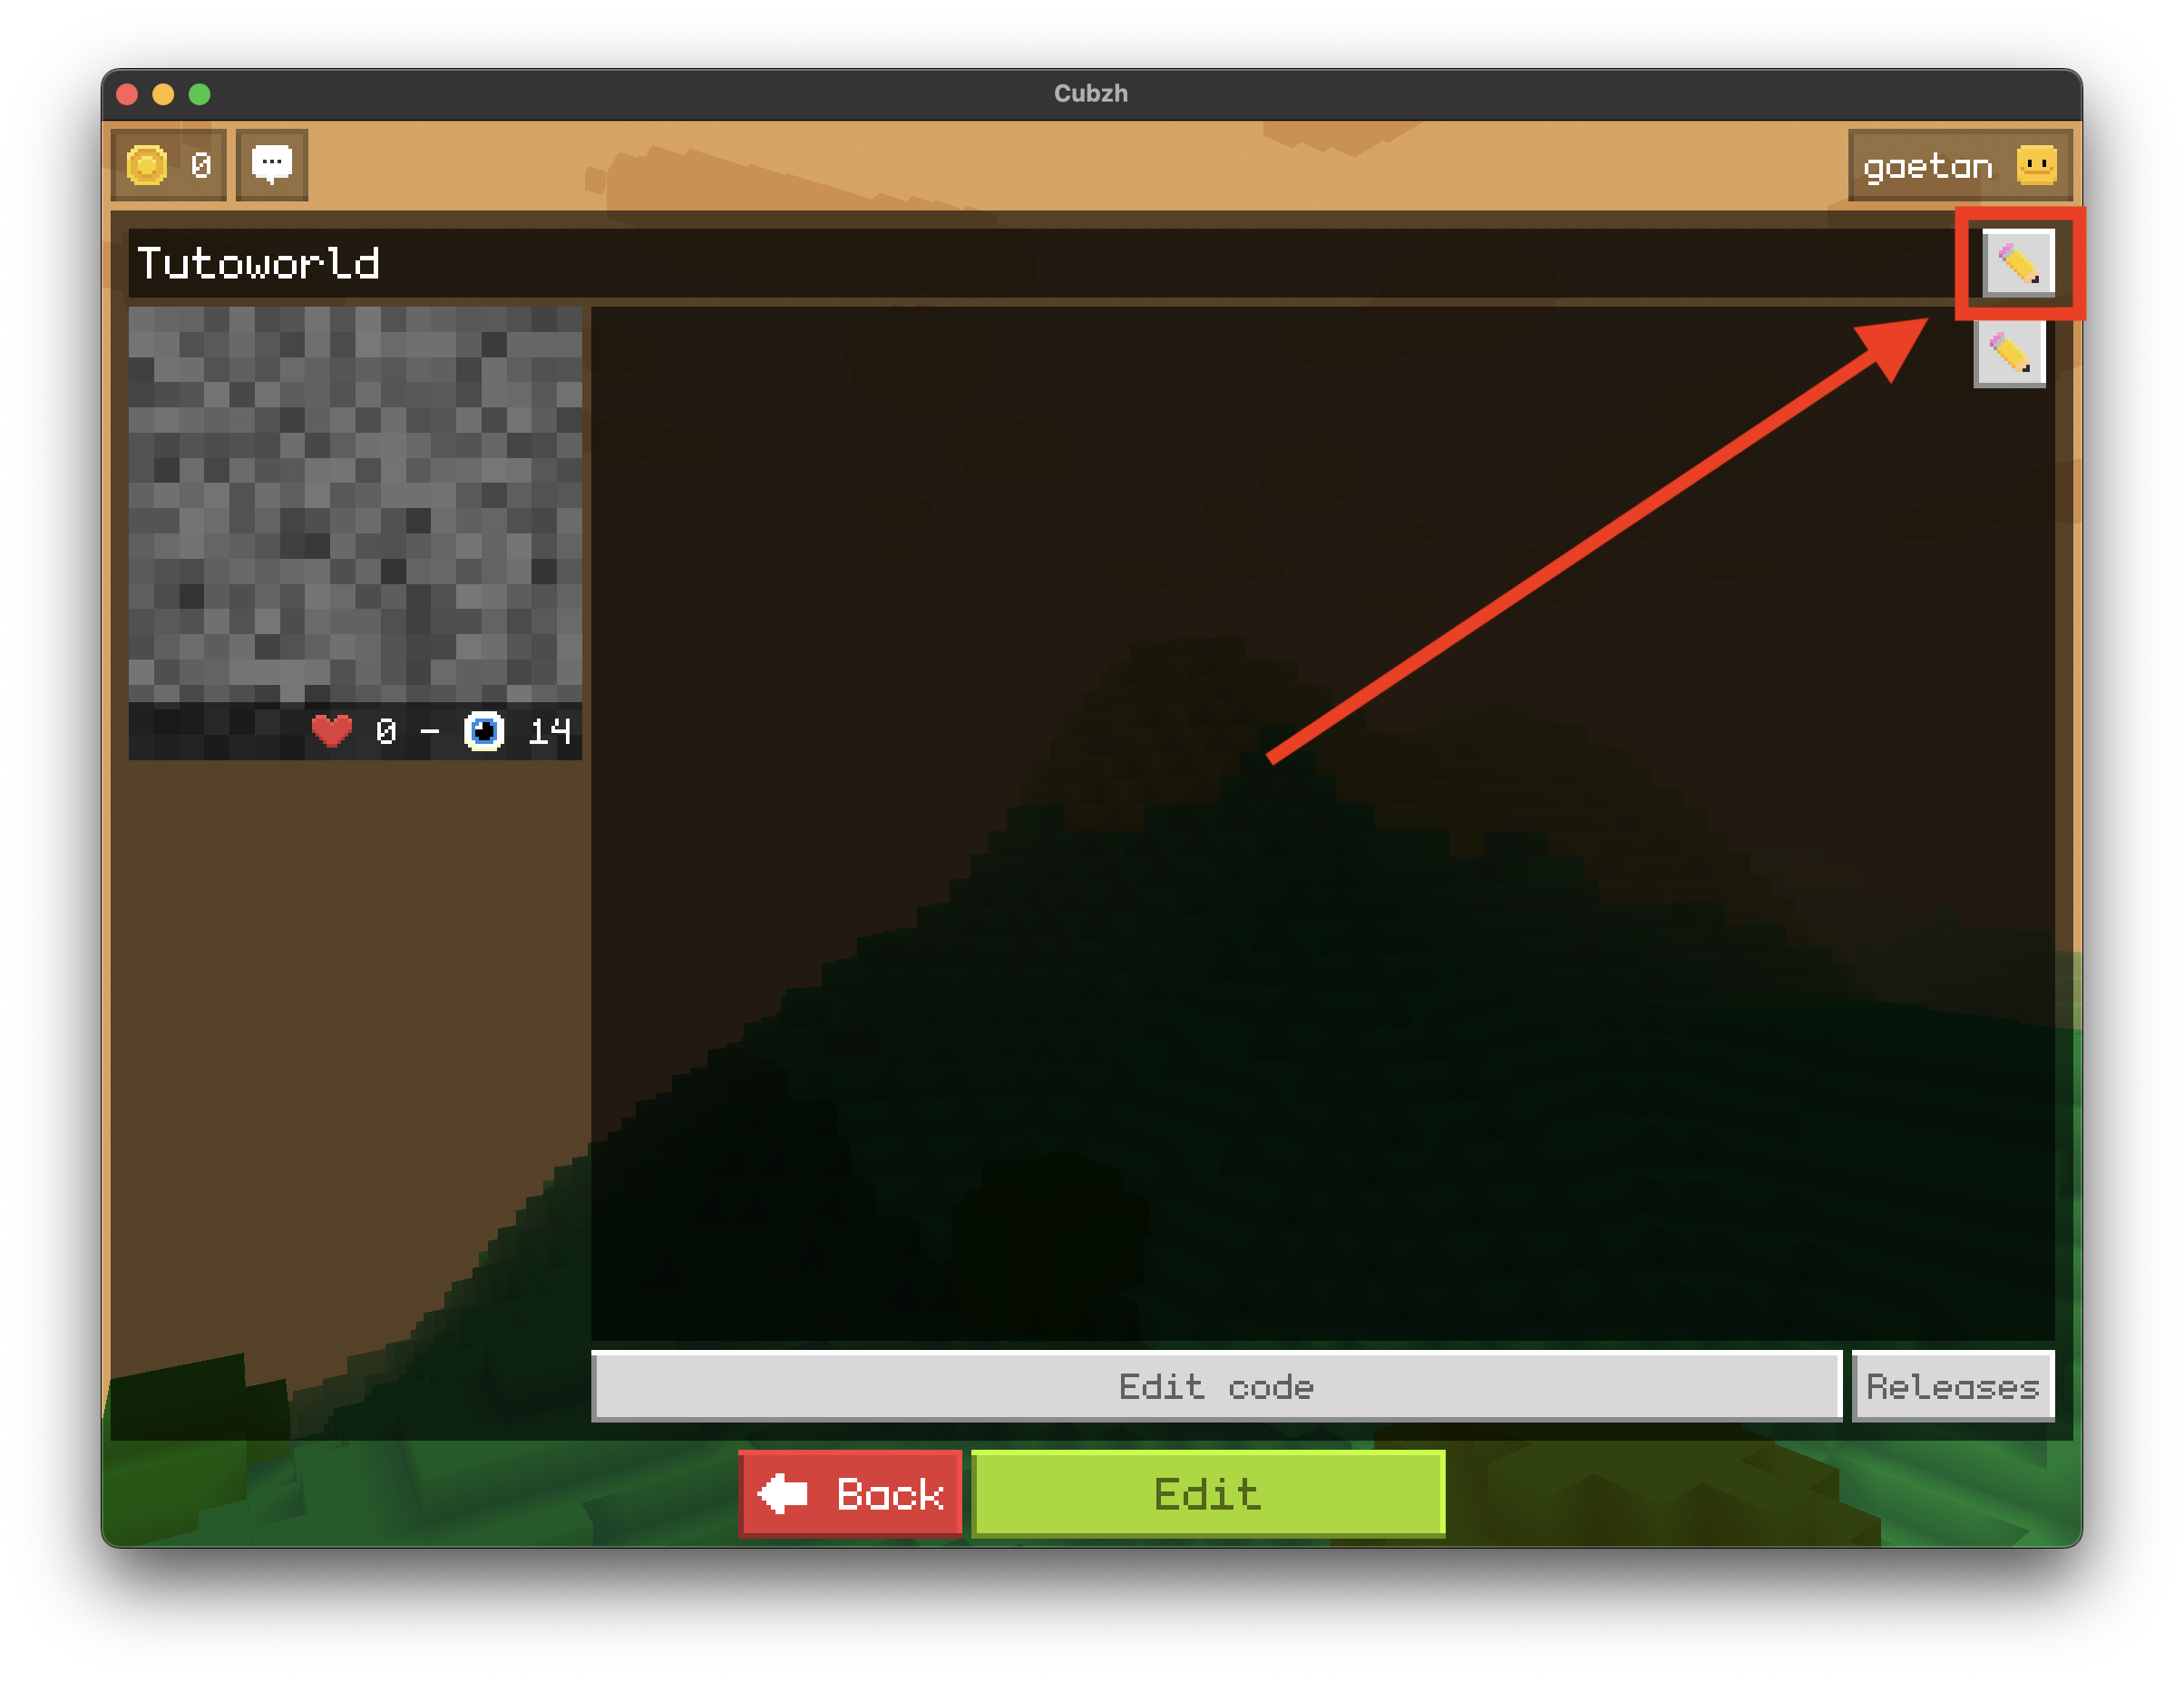
For now, let's click on the ✨ New world! ✨ button. This makes a new Cubzh world, gives it some default map and code and publishes it to the rest of the world. Since you are the author, you can now access its edit page and fill some info like the title and the description, or jump into it to actually edit its data! For example, to change the title, click on this icon in the top-right corner:
Because every new world is generated with some sample code that already allows you to move around, jump and explore a little voxel land, you'll see that if you click the Edit button you'll be directly teleported in the new world with some basic controls:
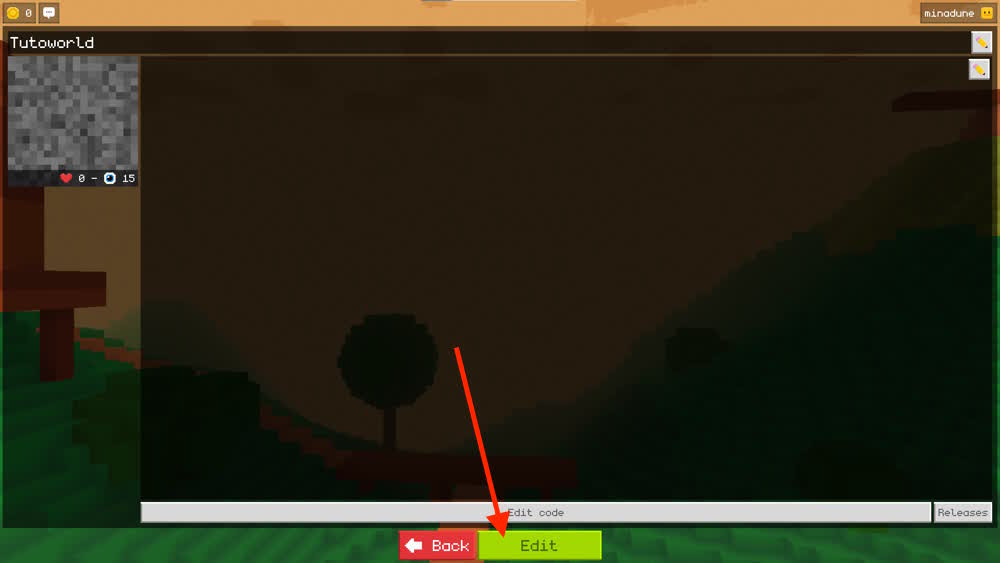
You can read the code that makes all of this possible by pausing the game and clicking the "Edit the code" button. For now, your game runs the following Lua code:
Config = {
    Map = "aduermael.hills"
}

Client.OnStart = function()

    -- Defines a function to drop
    -- the player above the map.
    dropPlayer = function()
        Player.Position = Number3(Map.Width * 0.5, Map.Height + 10, Map.Depth * 0.5) * Map.Scale
        Player.Rotation = { 0, 0, 0 }
        Player.Velocity = { 0, 0, 0 }
    end

    World:AddChild(Player)

    -- Call dropPlayer function:
    dropPlayer()
end

Client.Tick = function(dt)
    -- Game loop, executed ~30 times per second on each client.

    -- Detect if player is falling,
    -- drop it above the map when it happens.
    if Player.Position.Y < -500 then
        dropPlayer()
        Player:TextBubble("💀 Oops!")
    end
end

-- jump function, triggered with Action1
Client.Action1 = function()
    if Player.IsOnGround then
        Player.Velocity.Y = 100
    end
end

--
-- Server code
--

Server.Tick = function(dt)
    -- Server game loop, executed ~30 times per second on the server.
end
The code is quite self-explanatory for the most part... but don't worry: throughout the rest of this tutorial, we'll modify or expand on this snippet and gradually dive into its different parts.
Setting the world's map
First of all, let's look at the very first lines of the script:
Config = {
    Map = "aduermael.hills"
}
This Config object is where we set the global parameters of our world, and most importantly the map to use and the items to import. By default, the auto-generated code loads one of the maps made by the team, which is referenced by the code: aduermael.hills.
This is a good opportunity to say two important things about map and items in Cubzh:
1. they are all shared to every user in Cubzh - this means that, as soon as you know the reference of an asset, you can import and use it in your own game directly
2. all map or item references in Cubzh are built with the same format: creator_name.item_name. So, here, aduermael is the creator, and hills is the name of the map to import.
If you want to get started quickly, you can use some of the maps already prepared by our team:
- aduermael.mountains_cabin
- aduermael.lovely_castle
- aduermael.red_planet
- aduermael.rockies
- aduermael.unicorn_land
- claire.desert
- claire.city
- claire.camping_site
- minadune.islands_map
But, of course, you can also create your own! To do so, just go to the Item editor and assemble voxels to your liking :)
Note: at this time, there isn't a dedicated map editor yet. So you simply make a map "item", and then import it as the map of your world using the Config object.
For example, in my case, I prepared a small map called minadune.tutoworld_map:
So I can simply update the Config in my "Tutoworld" game to use it instead of the default one:
Config = {
    Map = "minadune.tutoworld_map"
}
And again, since all maps and items are shared, you can use this reference in your game too to use my map!
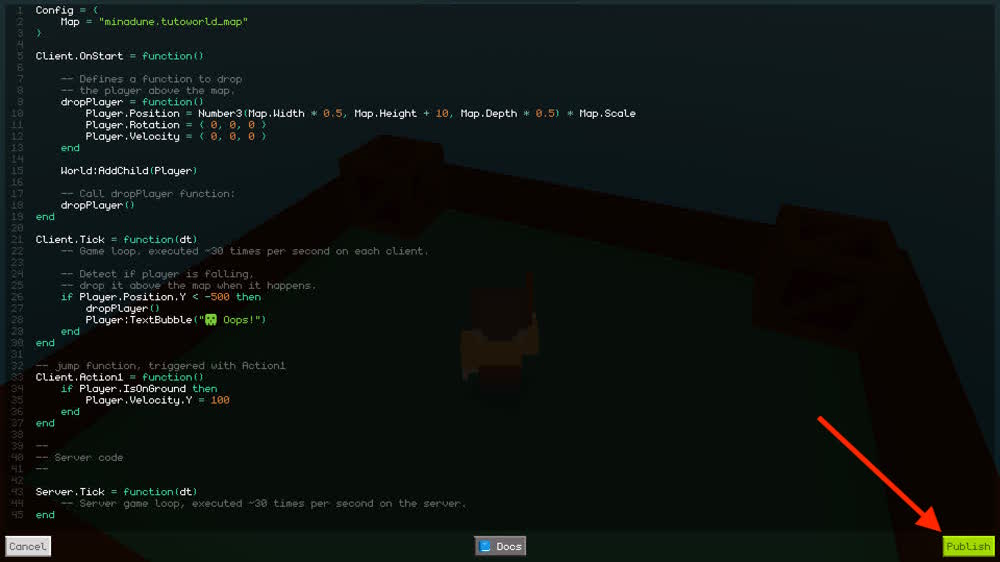
After updating the code, we just have to publish the changes to push the new game script online and share the new version with everyone (this will instantly relaunch the server for any player currently in the game, including us):
Instantiating items
Now, it's time to populate our scene by adding some objects in this map. This is done in two steps:
1. we import the item by defining its reference in the Config object of our game
2. we use this reference to create an actual copy of the item in the scene: we call this instantiating the item
In my case, I want to import a basic crate I prepared beforehand and that has the minadune.crate reference; so I'll just add a new Items key in my Config and add this reference to the list:
Config = {
    Map = "minadune.tutoworld_map",
    Items = {
        "minadune.crate",
    }
}
When you add a new item in a Lua table, like our Config object here, don't forget to separate each item by a comma , - for example, here, I've added a comma at the end of my Map = "minadune.tutoworld_map" line!
Note: although you could in theory list your items directly at the root of the Config object, it's best practice to group them in an inner Items object to make the code more readable ;)
Then, I can create an instance of my item by using the Shape API object and passing it my item's path. I'll put this crate spawning process in a new function at the root of the script (meaning below the Client.Action1 function, at the same level) to make it easier to re-use:
function spawnCrate()
    local crate = Shape(Items.minadune.crate)
end
We can also set some properties of the instance like its position in the world, its scale, etc. Of course, we're not required to set everything. Here, I'll pass some (X, Y, Z) position to my function to set my crate's position, and I'll scale it slightly:
function spawnCrate(x, y, z)
    local crate = Shape(Items.minadune.crate)
    crate.Position = Number3(x, y, z) * Map.Scale
    crate.Scale = 1.5
end
Finally, we need to make sure that our instance is actually a part of our world! Because, for now, it is just floating about, completely unanchored...
Like most game engines and 3D software, Cubzh relies on a system of hierarchy: you have a root node, the world, and then inside you have children nodes like the map, and then inside those children nodes you can have more nodes, and so on.
Right now, our new crate instance isn't parented to any node in this hierarchy, so it's effectively "disconnected" from the game's world. We can solve this by adding it as a child of the World object, or the Map:
function spawnCrate(x, y, z)
    local crate = Shape(Items.minadune.crate)
    crate.Position = Number3(x, y, z) * Map.Scale
    crate.Scale = 1.5
    World:AddChild(crate)
end
Now, we can call this spawnCrate() function from our Client.OnStart() entry point to have it run when the game first starts (I'll place this crate in one of the corners of my map):
Client.OnStart = function()

    -- Defines a function to drop
    -- the player above the map.
    dropPlayer = function()
        Player.Position = Number3(Map.Width * 0.5, Map.Height + 10, Map.Depth * 0.5) * Map.Scale
        Player.Rotation = { 0, 0, 0 }
        Player.Velocity = { 0, 0, 0 }
    end

    World:AddChild(Player)

    -- Call dropPlayer function:
    dropPlayer()

    spawnCrate(2, Map.Height, 2)
end
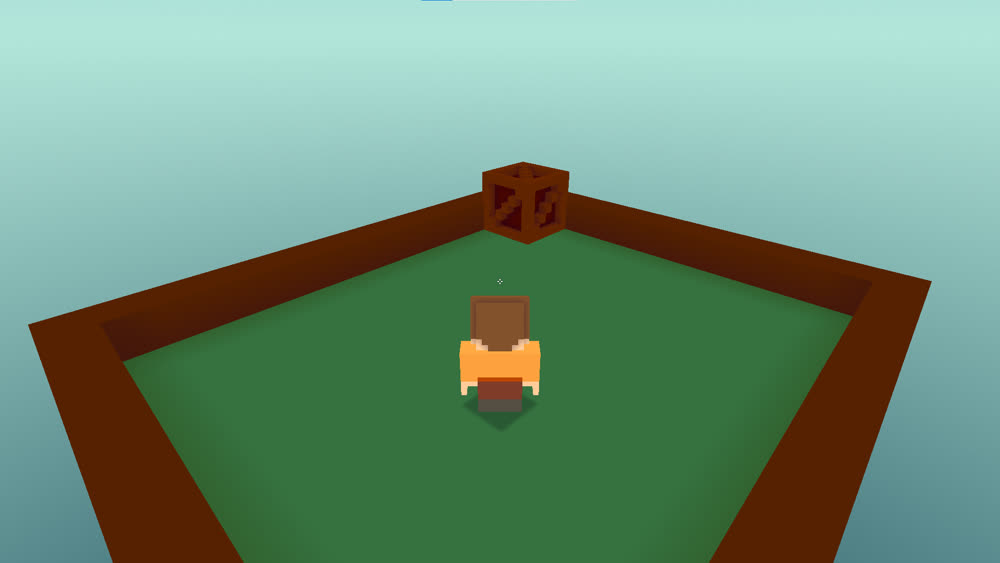
And if you re-publish, you'll see that there is now a crate on the terrain!
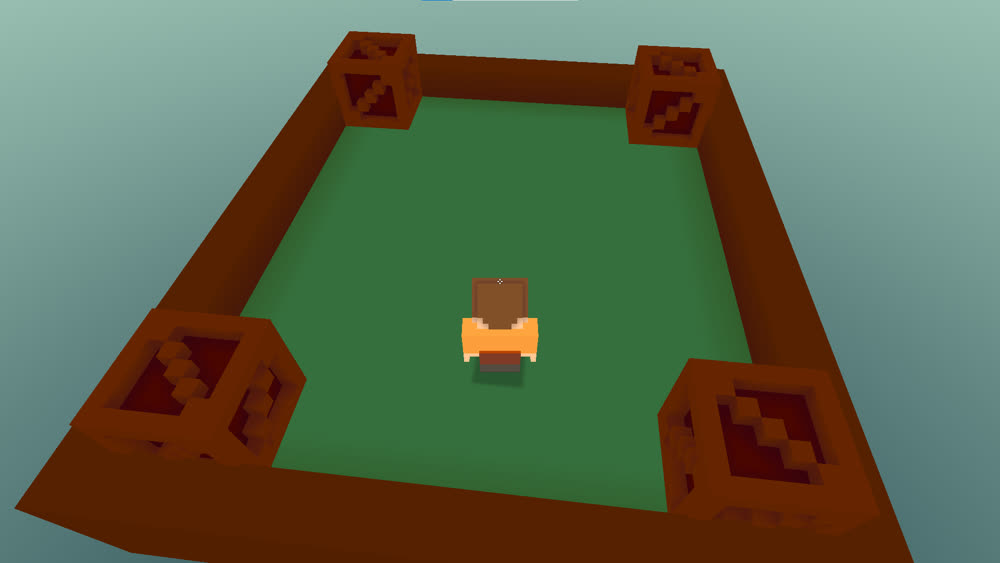
Then, let's simply wrap the instantiation process for the four crates (one in each corner) in a function to better encapsulate this initialisation step:
Client.OnStart = function()

    -- Defines a function to drop
    -- the player above the map.
    dropPlayer = function()
        Player.Position = Number3(Map.Width * 0.5, Map.Height + 10, Map.Depth * 0.5) * Map.Scale
        Player.Rotation = { 0, 0, 0 }
        Player.Velocity = { 0, 0, 0 }
    end

    World:AddChild(Player)

    -- Call dropPlayer function:
    dropPlayer()

    spawnCrates()
end

function spawnCrates()
    spawnCrate(2, Map.Height, 2)
    spawnCrate(Map.Width - 2, Map.Height, 2)
    spawnCrate(Map.Width - 2, Map.Height, Map.Depth - 2)
    spawnCrate(2, Map.Height, Map.Depth - 2)
end
Colliding with the objects
In the last part, we've successully added several instance of our minadune.crate item on the map. However, if you play the game now, you'll notice something pretty annoying: the player can walk through these objects!
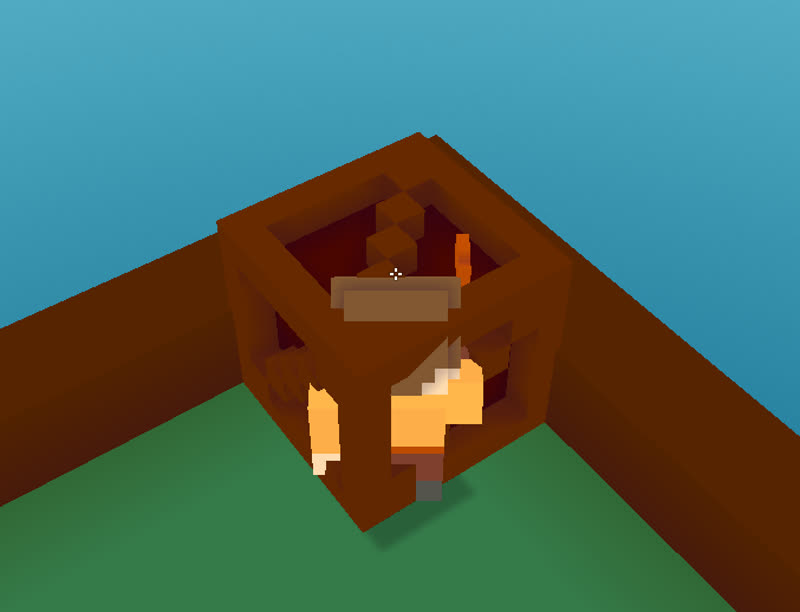
This is not very natural, and we should rather make sure the player collides with these crates. In Cubzh, this collision system works with CollisionGroups: you can assign objects to one or more groups, and then set which groups the player should collide with. This way, you can have some item on your map block the player, as if she/he was hitting an invisible wall when trying to get close to this object.
Note: at the moment, items can only have a box-shaped collision box.
There are 8 possible CollisionGroups, numbered from 1 to 8. So, for example, we can add each new crate to the group n°2 in our spawnCrate() function:
function spawnCrate(x, y, z)
    local crate = Shape(Items.minadune.crate)
    crate.Position = Number3(x, y, z) * Map.Scale
    crate.Scale = 1.5
    crate.CollisionGroups = 2
    World:AddChild(crate)
end
Then, we need to set up the player to compute collisions with this group. By default, it only collides with the CollisionGroup n°1 that contains the map, so that you don't instantly fall to your death... but we can easily add more, like this:
Client.OnStart = function()
    -- Player collides with:
    --  - the Map (1)
    --  - the crates (2)
    Player.CollidesWithGroups = { 1, 2 }

    ...
end
If we re-publish and retry walking towards a crate, our avatar is now stopped as soon as it hits the object :)
Equipping a sword and destroying the crates!
Now that the map is initialised properly, time to actually add some cool action in this game! As shown in the demo above, what I want to do is have a sword in my right hand and use one of the available user actions to "attack" and break the crates.
Luckily, Cubzh has lots of nice quick-wins to help us to do all of that :)
First, let's equip a word: we just have to import a matching item by its reference (for example, the aduermael.wooden_sword) and then use the readily available EquipRightHand() method on our Player object:
Config = {
    Map = "minadune.tutoworld_map",
    Items = {
        "aduermael.wooden_sword",
        "minadune.crate",
    }
}

Client.OnStart = function()
    -- Player collides with:
    --  - the Map (1)
    --  - the crates (2)
    Player.CollidesWithGroups = { 1, 2 }

    -- Add weapon in the player's hand
    Player:EquipRightHand(Items.aduermael.wooden_sword)

    ...
end
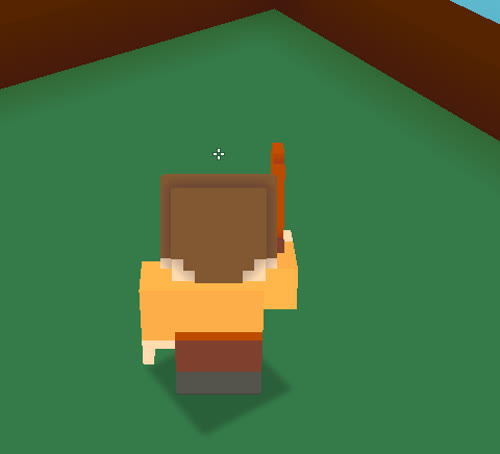
Tadaa! The avatar now start the game with a sword in its right hand:
The next step is to call another handy function of the Player, SwingRight(), to display a short attack animation when the user triggers a given action.
Cubzh has 5 types of action that are totally cross-platform:
- Action1
- Action2
- Action3
- DirectionalPad
- AnalogPad
The DirectionalPad is for the keyboard directional keys, the AnalogPad is for the mouse movements and the Action1, Action2 and Action3 are configured differently on computers and on mobiles:
Computers
- Action1: Space bar
- Action2: Left click
- Action3: Right click
Mobiles
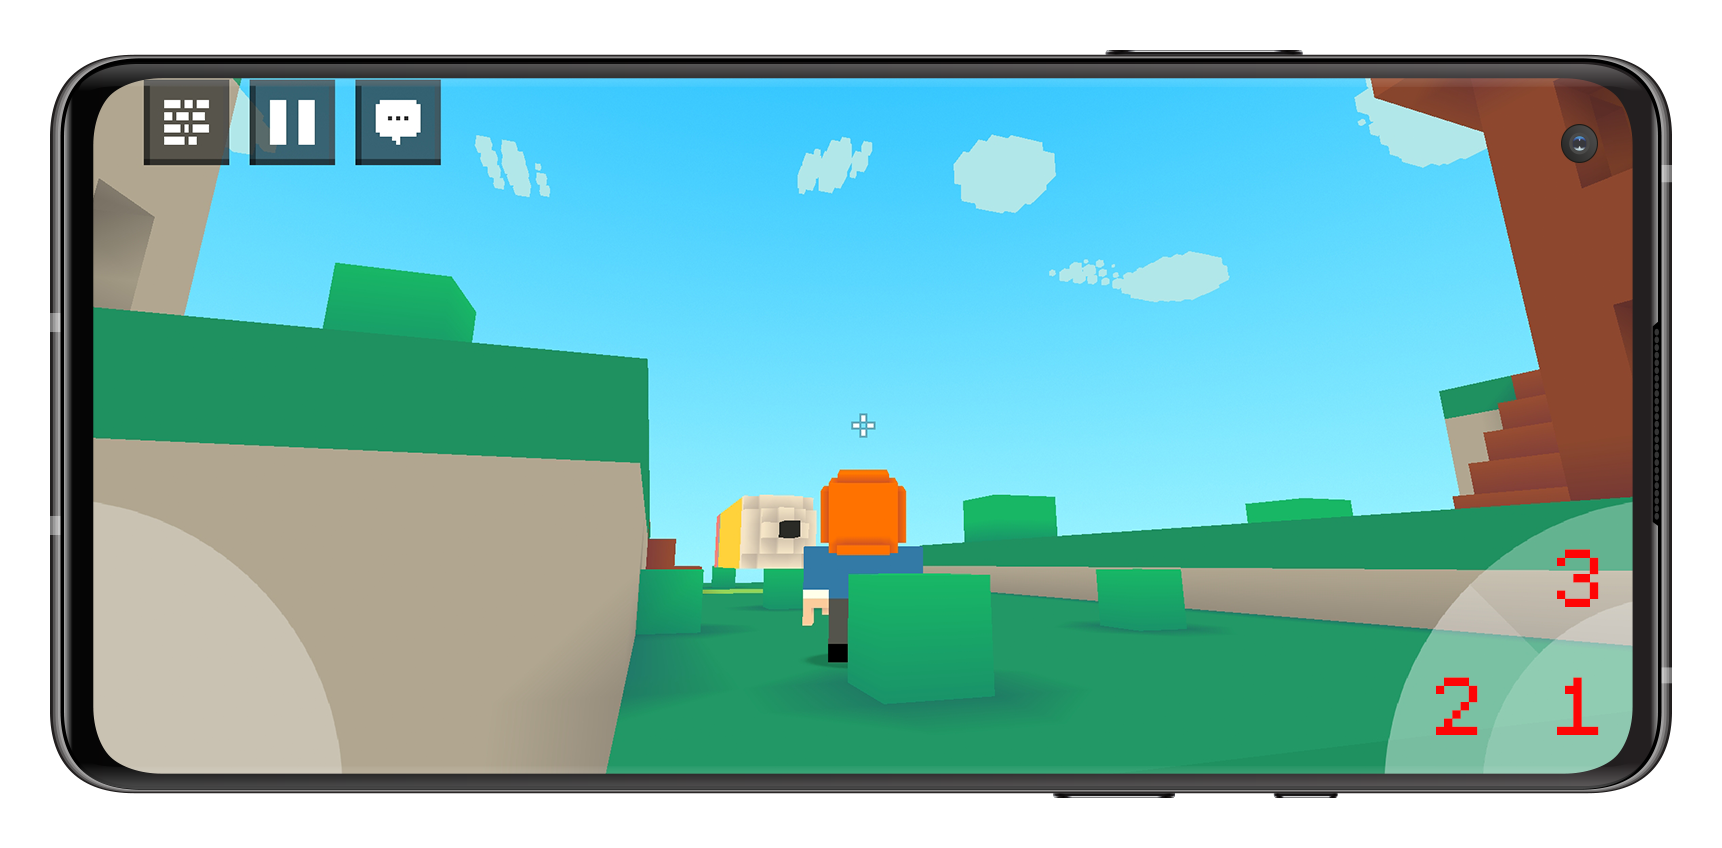
Here, the most intuitive action to use is the Action2; so let's define it and, inside, call Player:SwingRight():
-- attack function, triggered with the Left click
Client.Action2 = function()
    Player:SwingRight()
end
Of course, for now, this "attack" isn't actually doing anything... we need to check if the player is currently facing a crate and close enough when she/he hits the Action1 button. To do this, we have to use the Ray object and do a "raycast": in short, we're going to project a virtual invisible ray from the player's avatar to infinity in its forward direction and look for any "impacts" on objects in the world:

This is easy to do thanks to the Player:CastRay() method, but we need to be careful about a couple of things:
- this raycast will report the impacts on both the crates and the map, but we're only interested in the ones on the crates: this means we'll have to examine the object the ray hit when we get an impact and ignore it if this object is the map
- we also want to limit the "attack range" of the player: we should only be able to destroy the crate if we're somewhat near it
So let's expand our Client.Action2() function with this raycast logic and define a global crateDestroyDistance to set this attack range. Then, to "destroy" the crates, we'll remove them from their parent to take them out of the game:
Client.OnStart = function()
    ...
    -- Global variables
    crateDestroyDistance = 15
end

-- attack function, triggered with the Left click
Client.Action2 = function()
    Player:SwingRight()
    local impact = Player:CastRay()
    if impact ~= nil and impact.Object ~= Map then
        if impact.Distance <= crateDestroyDistance then
            destroyCrate(impact.Object)
        end
    end
end

function destroyCrate(crate)
    crate:RemoveFromParent()
end
Spawning, animating & collecting the gems
Our "Tutoworld" game is starting to look a bit better - but we still can't loot any gem! So let's insure that whenever a crate is destroyed, a gem pops in its place and hovers around to catch the player's attention:
The instantiation process is the same as before: we import the minadune.gem item, instantiate it with the Shape API and set some properties:
Config = {
    Map = "minadune.tutoworld_map",
    Items = {
        "aduermael.wooden_sword",
        "minadune.crate",
        "minadune.gem",
    }
}

function destroyCrate(crate)
    local spawnGem = function(pos)
        local gem = Shape(Items.minadune.gem)
        gem.Position = pos
        gem.Scale = 0.5
        World:AddChild(gem)
    end
    spawnGem(crate.Position)
    crate:RemoveFromParent()
end
But then, how to animate this item? Cubzh doesn't yet have too much in terms of animation, so we're going to do it by hand by using the Client.Tick function to gradually update the rotations and positions of the gems currently present in the world. This means that:
- we need to keep track of the gems we create in a table and then iterate through it
- we should also keep track of the current in-game time to create a periodic movement using a trigonometric function
All of this gives us the following code:
Client.OnStart = function()
    ...
    -- Global variables
    crateDestroyDistance = 15

    time = 0
    gems = {}
end

Client.Tick = function(dt)
    -- Game loop, executed ~30 times per second on each client.
    time = time + dt
    for i, gem in ipairs(gems) do
        gem.Position.Y = (Map.Height + 0.5 * math.sin(time)) * Map.Scale.Y
        gem.LocalRotation.Y = gem.LocalRotation.Y + dt
    end
end

function destroyCrate(crate)
    local spawnGem = function(pos)
        local gem = Shape(Items.minadune.gem)
        gem.Position = pos
        gem.Scale = 0.5
        World:AddChild(gem)
        -- add to "gems" table
        table.insert(gems, gem)
    end
    spawnGem(crate.Position)
    crate:RemoveFromParent()
end
Last but not least, let's add some logic to actually collect the gems! Basically, the idea is to look at the position of the player and each gem and, in case they overlap, loot the gem. The engine doesn't have area triggers for now, so we'll use our own collides() function:
Client.OnStart = function()
    ...
    -- Global variables
    kPlayerHeight = 10.5 -- 2.1 map cubes
    kPlayerHalfWidth = 2.0
    kPlayerHalfDepth = 2.0

    crateDestroyDistance = 15

    time = 0
    gems = {}
end

-- the engine can't report collisions yet (but it will)
-- implementing simple collision test for this game in
-- the meantime...
function collides(shape)
    local playerMin = Number3(
        Player.Position.X - kPlayerHalfWidth,
        Player.Position.Y,
        Player.Position.Z - kPlayerHalfDepth)
    local playerMax = Number3(
        Player.Position.X + kPlayerHalfWidth,
        Player.Position.Y + kPlayerHeight,
        Player.Position.Z + kPlayerHalfDepth)
    local halfSize = (
        shape.Width > shape.Depth
        and shape.Width * 0.5
        or shape.Depth * 0.5) * shape.LocalScale.X
    local shapeMin = Number3(
        shape.Position.X - halfSize,
        shape.Position.Y,
        shape.Position.Z - halfSize)
    local shapeMax = Number3(
        shape.Position.X + halfSize,
        shape.Position.Y + shape.Height * shape.LocalScale.X,
        shape.Position.Z + halfSize)
    if playerMax.X > shapeMin.X and
        playerMin.X < shapeMax.X and
        playerMax.Y > shapeMin.Y and
        playerMin.Y < shapeMax.Y and
        playerMax.Z > shapeMin.Z and
        playerMin.Z < shapeMax.Z then
        return true
    end
    return false
end
This way, we can very easily check if the player is close of a gem and should loot it. In that case, we'll remove the gem from the game and from the gems table and we'll increase the current score:
Client.OnStart = function()
    ...
    -- Global variables
    crateDestroyDistance = 15

    time = 0
    score = 0
    gems = {}
end

Client.Tick = function(dt)
    -- Game loop, executed ~30 times per second on each client.
    time = time + dt
    for i, gem in ipairs(gems) do
        gem.Position.Y = (Map.Height + 0.5 * math.sin(time)) * Map.Scale.Y
        gem.LocalRotation.Y = gem.LocalRotation.Y + dt

        if collides(gem) then
            pickupGem(i, gem)
        end
    end
end

function pickupGem(i, gem)
    score = score + 1
    table.remove(gems, i)
    gem:RemoveFromParent()
end
And by the way, since we already know that there are exactly 4 gems to collect, we can directly call an endGame() function as soon as our score reaches this value:
function pickupGem(i, gem)
    score = score + 1
    table.remove(gems, i)
    gem:RemoveFromParent()

    if score == 4 then endGame() end
end

function endGame()
end
Adding a basic UI & handling the end of the game
We're almost there! The last thing we need to do is add some UI label on our screen to show the score we just computed and design the end screen to let players easily replay our game.
Cubzh allows us to create simple interfaces using its UI API. For example, we can create a label and anchor it at the top center of the screen to display our score:
Client.OnStart = function()
    ...
    -- UI variables
    ui = {}
    ui.gemsLabel = UI.Label("", Anchor.HCenter, Anchor.Top)
    ui.gemsLabel.TextColor = Color(0, 0, 0)
    ui.gemsLabel.Text = "Gems:" .. score
end
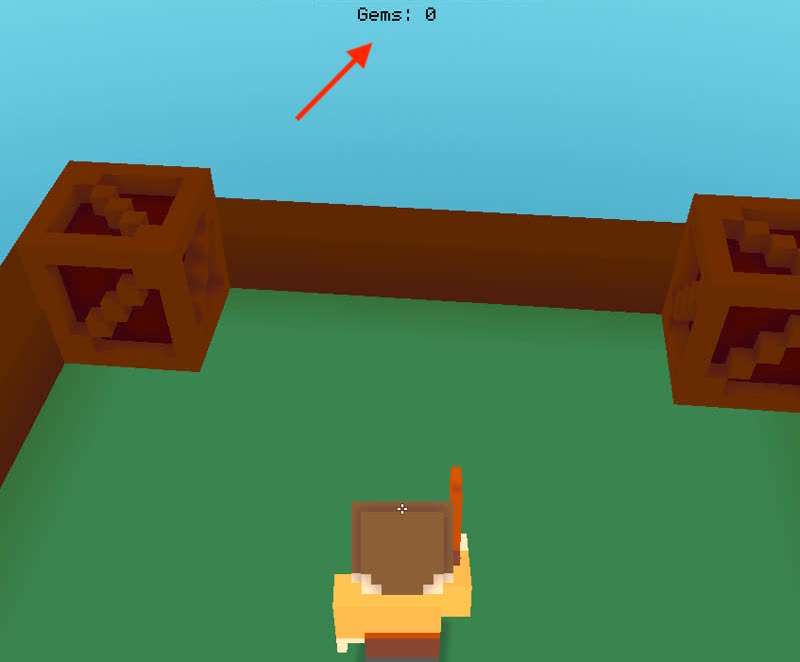
Note: you are free to organise your UI like you want in the code and you're not required to put everything in a ui table; but it's usually a good idea to try and group related Lua code in a structure like this to have a more readable code :)
Then, to update it when we pickup a new gem, we can simply update the text with the new value of the score at the right time:
function pickupGem(i, gem)
    score = score + 1
    table.remove(gems, i)
    gem:RemoveFromParent()

    ui.gemsLabel.Text = "Gems:" .. score

    if score == 4 then endGame() end
end
Finally, let's implement an end screen with a congratulations message and a "Restart!" button:
Overall, it's just about adding more elements to our UI and enabling or disabling the right ones when need be. We also have to make sure our pointer is in the proper mode (we can toggle whether it is in "game pointer mode" or a default mouse pointer with the Pointer API, and whether the pointer is a crosshair or not with the UI.Crosshair property):
Client.OnStart = function()
    ...
    -- UI variables
    ui = {}
    ui.gemsLabel = UI.Label("", Anchor.HCenter, Anchor.Top)
    ui.gemsLabel.TextColor = Color(0, 0, 0)
    ui.gemsLabel.Text = "Gems:" .. score

    ui.win = {}
    ui.win.message = Label("Victory, you got all the gems!")
    ui.win.restartButton = Button("Restart!")
    ui.win.restartButton.Color = Color(37, 232, 156)

    ui.win.message:Remove()
    ui.win.restartButton:Remove()

    -- Switch to in-game pointer
    Pointer:Hide()
    UI.Crosshair = true
end

function endGame()
    -- Switch to default pointer
    Pointer:Show()
    UI.Crosshair = false

    -- Hide score
    ui.gemsLabel:Remove()
    -- Show end screen UI
    ui.win.message:Add(Anchor.HCenter, Anchor.VCenter)
    ui.win.restartButton:Add(Anchor.HCenter, Anchor.VCenter)
end
The last step is to move some of our code to an initGame() function so we can assign it as the callback of the "Restart!" button (on its OnRelease property) and call it when the game first starts - this will give us a consistent behaviour at each retry:
Client.OnStart = function()
    ...
    -- UI variables
    ui = {}
    ui.gemsLabel = UI.Label("", Anchor.HCenter, Anchor.Top)
    ui.gemsLabel.TextColor = Color(0, 0, 0)

    ui.win = {}
    ui.win.message = Label("Victory, you got all the gems!")
    ui.win.restartButton = Button("Restart!")
    ui.win.restartButton.Color = Color(37, 232, 156)
    ui.win.restartButton.OnRelease = initGame

    initGame()
end

function initPlayer()
    Player.Position = Number3(Map.Width * 0.5, Map.Height, Map.Depth * 0.5) * Map.Scale
    Player.Rotation = { 0, 0, 0 }
    Player.Velocity = { 0, 0, 0 }
end

function initGame()
    -- Initialize map with some crates to loot
    spawnCrates()

    -- Place player
    initPlayer()
    World:AddChild(Player, true)

    -- Reset variables
    time = 0
    score = 0
    gems = {}

    -- Setup UI elements
    ui.gemsLabel.Text = "Gems: " .. score
    ui.gemsLabel:Add(Anchor.HCenter, Anchor.Top)
    ui.win.message:Remove()
    ui.win.restartButton:Remove()

    -- Switch to in-game pointer
    Pointer:Hide()
    UI.Crosshair = true
end
Some bonus features
We now have a simple but nice game to play around with: "Tutoworld"! There are little improvements we can add to get an even better user experience, like:
- fixing the time to noon to always have enough light using the TimeCycle and Time objects:
Client.OnStart = function()
    -- Disables night/day cycle
    -- (and initializes at noon)
    TimeCycle.On = false
    Time.Current = Time.Noon

    ...
end
- making sure the player is "re-spawned" on the map if she/he ever jumps out of it:
Client.Tick = function(dt)
    if Player.Position.Y < -100 then
        initPlayer()
    end

    -- Game loop, executed ~30 times per second on each client.
    ...
end
- hiding the player's avatar when the end screen is on, and toggling it back again on restart... and even completely stop it from moving when the game has ended by overriding the Client.DirectionalPad default implementation and "pausing" the player:
function initPlayer()
    ...
    Player.Motion = { 0, 0, 0 }
end

function initGame()
    paused = false
    ...
    Player.IsHidden = false
end

function endGame()
    paused = true
    ...
    Player.IsHidden = true
    Player.Motion = { 0, 0, 0 }
    Player.Velocity = { 0, 0, 0 }
end

Client.DirectionalPad = function(x, y)
    -- storing globals here for AnalogPad
    -- to update Player.Motion
    dpadX = x
    dpadY = y
    if not paused then
        Player.Motion = (Player.Forward * y + Player.Right * x) * 50
    end
end

Client.AnalogPad = function(dx, dy)
    Player.LocalRotation.Y = Player.LocalRotation.Y + dx * 0.01
    Player.LocalRotation.X = Player.LocalRotation.X + -dy * 0.01

    if dpadX ~= nil and dpadY ~= nil then
        if not paused then
            Player.Motion = (Player.Forward * dpadY + Player.Right * dpadX) * 50
        end
    end
end
Conclusion
In this first tutorial, we made a simple solo-game, "Tutoworld", and we discussed quite a lot of Cubzh features, among which: maps and items instantiation, collisions and triggers, raycasts and even a bit of UI!
You can find the game on Cubzh (by going to the worlds list and searching for "Tutoworld") or re-create your own and then tweak it to your liking: feel free to share all your creations with us, we'd love to hear from you! :)
Resources & links
API objects used in this tutorial:
- Button
- Client
- CollisionGroup
- Color
- Config
- Impact
- Items
- Label
- Map
- Number3
- Object (indirectly)
- Player
- Pointer
- Ray (indirectly)
- Shape
- Time
- TimeCycle
- UI
- World
Final code
As a reference, here is the final code of "Tutoworld" - remember that you can also check it out directly on Cubzh by playing the game and clicking the "Read the code" button!
Config = {
    Map = "minadune.tutoworld_map",
    Items = {
        "aduermael.wooden_sword",
        "minadune.crate",
        "minadune.gem",
    }
}

-- =====================
-- Base client functions
-- =====================
Client.OnStart = function()
    -- Disables night/day cycle
    -- (and initializes at noon)
    TimeCycle.On = false
    Time.Current = Time.Noon

    -- Player collides with:
    --  - the Map (1)
    --  - the crates (2)
    Player.CollidesWithGroups = { 1, 2 }

    -- Add weapon in the player's hand
    Player:EquipRightHand(Items.aduermael.wooden_sword)

    -- Add player to game
    World:AddChild(Player, true)

    -- Global variables
    kPlayerHeight = 10.5 -- 2.1 map cubes
    kPlayerHalfWidth = 2.0
    kPlayerHalfDepth = 2.0

    crateDestroyDistance = 15

    -- UI variables
    ui = {}
    ui.gemsLabel = UI.Label("", Anchor.HCenter, Anchor.Top)
    ui.gemsLabel.TextColor = Color(0, 0, 0)

    ui.win = {}
    ui.win.message = Label("Victory, you got all the gems!")
    ui.win.restartButton = Button("Restart!")
    ui.win.restartButton.Color = Color(37, 232, 156)
    ui.win.restartButton.OnRelease = initGame

    initGame()
end

Client.Tick = function(dt)
    -- Respawn player if out of the map
    if Player.Position.Y < -100 then
        initPlayer()
    end

    -- Game loop, executed ~30 times per second on each client.
    time = time + dt
    for i, gem in ipairs(gems) do
        gem.Position.Y = (Map.Height + 0.5 * math.sin(time)) * Map.Scale.Y
        gem.LocalRotation.Y = gem.LocalRotation.Y + dt

        if collides(gem) then
            pickupGem(i, gem)
        end
    end
end

-- jump function, triggered with the Spacebar
Client.Action1 = function()
    if Player.IsOnGround then
        Player.Velocity.Y = 100
    end
end

-- attack function, triggered with the Left click
Client.Action2 = function()
    Player:SwingRight()
    local impact = Player:CastRay()
    if impact ~= nil and impact.Object ~= Map then
        if impact.Distance <= crateDestroyDistance then
            destroyCrate(impact.Object)
        end
    end
end

Client.DirectionalPad = function(x, y)
    -- storing globals here for AnalogPad
    -- to update Player.Motion
    dpadX = x
    dpadY = y
    if not paused then
        Player.Motion = (Player.Forward * y + Player.Right * x) * 50
    end
end

Client.AnalogPad = function(dx, dy)
    Player.LocalRotation.Y = Player.LocalRotation.Y + dx * 0.01
    Player.LocalRotation.X = Player.LocalRotation.X + -dy * 0.01

    if dpadX ~= nil and dpadY ~= nil then
        if not paused then
            Player.Motion = (Player.Forward * dpadY + Player.Right * dpadX) * 50
        end
    end
end

-- =================
-- Utility functions
-- =================
function initPlayer()
    Player.Position = Number3(Map.Width * 0.5, Map.Height, Map.Depth * 0.5) * Map.Scale
    Player.Rotation = { 0, 0, 0 }
    Player.Velocity = { 0, 0, 0 }
    Player.Motion = { 0, 0, 0 }
end

function initGame()
    paused = false

    -- Initialize map with some crates to loot
    spawnCrates()

    -- Place player
    initPlayer()
    Player.IsHidden = false

    -- Reset variables
    time = 0
    score = 0
    gems = {}

    -- Setup UI elements
    ui.gemsLabel.Text = "Gems: " .. score
    ui.gemsLabel:Add(Anchor.HCenter, Anchor.Top)
    ui.win.message:Remove()
    ui.win.restartButton:Remove()

    Pointer:Hide()
    UI.Crosshair = true
end

function spawnCrate(x, y, z)
    local crate = Shape(Items.minadune.crate)
    crate.Position = Number3(x, y, z) * Map.Scale
    crate.Scale = 1.5
    crate.CollisionGroups = 2
    World:AddChild(crate)
end

function spawnCrates()
    spawnCrate(2, Map.Height, 2)
    spawnCrate(Map.Width - 2, Map.Height, 2)
    spawnCrate(Map.Width - 2, Map.Height, Map.Depth - 2)
    spawnCrate(2, Map.Height, Map.Depth - 2)
end

function destroyCrate(crate)
    local spawnGem = function(pos)
        local gem = Shape(Items.minadune.gem)
        gem.Position = pos
        gem.Scale = 0.5
        World:AddChild(gem)
        table.insert(gems, gem)
    end
    spawnGem(crate.Position)
    crate:RemoveFromParent()
end

function pickupGem(i, gem)
    score = score + 1
    table.remove(gems, i)
    gem:RemoveFromParent()

    ui.gemsLabel.Text = "Gems:" .. score

    if score == 4 then endGame() end
end

function endGame()
    paused = true

    -- switch to pointer mode
    Pointer:Show()
    UI.Crosshair = false

    -- Hide score
    ui.gemsLabel:Remove()
    -- Show end screen UI
    ui.win.message:Add(Anchor.HCenter, Anchor.VCenter)
    ui.win.restartButton:Add(Anchor.HCenter, Anchor.VCenter)

    -- Hide + Stop the player
    Player.IsHidden = true
    Player.Velocity = { 0, 0, 0 }
    Player.Motion = { 0, 0, 0 }
end

-- the engine can't report collisions yet (but it will)
-- implementing simple collision test for this game in
-- the meantime...
function collides(shape)
    local playerMin = Number3(
        Player.Position.X - kPlayerHalfWidth,
        Player.Position.Y,
        Player.Position.Z - kPlayerHalfDepth)
    local playerMax = Number3(
        Player.Position.X + kPlayerHalfWidth,
        Player.Position.Y + kPlayerHeight,
        Player.Position.Z + kPlayerHalfDepth)
    local halfSize = (
        shape.Width > shape.Depth
        and shape.Width * 0.5
        or shape.Depth * 0.5) * shape.LocalScale.X
    local shapeMin = Number3(
        shape.Position.X - halfSize,
        shape.Position.Y,
        shape.Position.Z - halfSize)
    local shapeMax = Number3(
        shape.Position.X + halfSize,
        shape.Position.Y + shape.Height * shape.LocalScale.X,
        shape.Position.Z + halfSize)
    if playerMax.X > shapeMin.X and
        playerMin.X < shapeMax.X and
        playerMax.Y > shapeMin.Y and
        playerMin.Y < shapeMax.Y and
        playerMax.Z > shapeMin.Z and
        playerMin.Z < shapeMax.Z then
        return true
    end
    return false
end

